 8/17/14 UPDATE (Original post below):
 Few changes to note given the recipe below. First, with the soaked apple wood chips, add to the Smokenator every hour and smoke for between 4-5 hours to about 170 internal. Second, if placing the wrapped pork butt in an oven, ensure that there is a pan underneath. Third, once the cook phase is complete, place a layer of plastic wrap around the pork and place the pork in a cooler wrapped in towels to sit for about 3 hours. Fourth, after the pork has sit in the cooler, before serving, place back on the smoker for a dry smoke for about 20-30 minutes to allow the crust to bark up. When finishing this way, allow the empty water pan to sit over the Smokenator to keep the heat down during the dry smoke. If having pulled pork sandwiches, try a little
Sweet Baby Rays BBQ Sauce, seems to go very well.
 Original Post:
One of the main goals of this page is to make really great, traditionally difficult, restaurant-caliber recipes accessible to everyone. With this in mind, the hardware required for each recipe should be common; and when it comes to BBQ, there is no more common tool than a
Weber kettle.
The Hardware
That’s right, we will be making real, Texas-Style, smoked pulled pork not using a
Traeger, a
Bradley or even a
Big Green Egg; but instead, a simple
22.5″ Weber Kettle. There is a required accessory, however, a
Smokenator 1000. The Smokenator is the best way to cook low and slow using the
indirect-method on a Weber Kettle and at around $60, it should fit most budgets. In Portland, you can buy Smokenator’s at the
Portland BBQ Shop.
A few other things to have, I’ll explain where the come into play below:
–
Kingsford original briquettes
–
2 large drip pans
–
1 bag of Applewood chips
–
CDN Temperature Probe
–
Chimney starter
–
Non-toxic fire starter
–
4 Binder Clips
The Process
Buy a 4-5lb Pork Butt from your favorite local butcher.

Rub the Pork Butt with your favorite Pork rub.
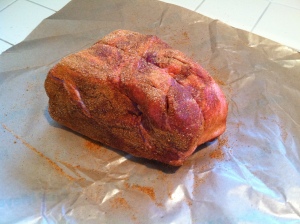
I prefer
SuckleBusters Competition BBQ Rub (this stuff is gooooood!).

Wrap the Pork in plastic wrap and refrigerate overnight.

At the same time, take your Applewood chips and soak them in water overnight.

The following morning, make the settings on your Weber. On the bottom vent, stick a pencil in the gap and close the lower vent until it hits the pencil. On the lid vent, close it a little more than half way.

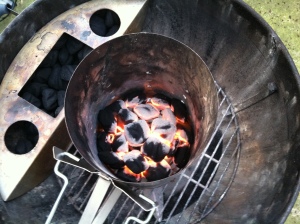
Now insert the Smokenator. Once installed (it literally just drops in and latches slightly), load the Smokenator until its full, about 60 briquettes.
 Now:
Now:
– If the temperature outside is under 50 degrees, remove 20 briquettes from the Smokenator.
– If the temperature is over 50 degrees, remove 15 briquettes.
Place these removed briquettes into the chimney starter- DO NOT use lighter fluid on the briquettes, instead use your non-toxic fire starter to ignite.
Let these briquettes light for 15 minutes in the chimney, which will light them about 75%.
After 15 minutes, dump the briquettes back into the Smokenator (which contains the other unlit briquettes). This approach is known as the
Minion Method, which allows the briquettes to slowly ignite and burn off, maintaining a low cook temperature that maintains in the kettle for 4-6 hours.

With the briquettes in the Smokenator, place one of the large drip pans on the lower rack of the Weber.

Place on the top rack of the Weber the second large drip pan and fill this pan with water.

Place the cover on the Weber and let the temperature come up to 225 degrees.

Once the temperature comes up and maintains 225, remove the lid and slide the water pan to the side slightly so you can lift the side edge of the top rack- allowing access to the briquettes in the Smokenator. Grab two handfuls of the soaked Applewood chips and spread them out over the lit briquettes in the Smokenator, this will start them smoking.
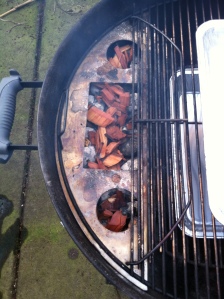
Now close the top rack and slide the water back over the Smokenator. Grab your Pork Butt and place it over the large drip pan on the lower rack.

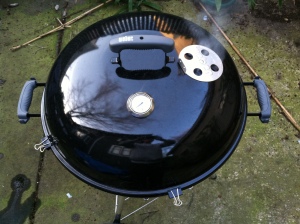
Place the lid on the grill and secure it to the base of the kettle using the 4 binder clips.

This will ensure that the smoke does not escape the side of the lid; it will also improve the longevity of the briquettes.
 Keep in mind from this point, there are 3 primary phases to this process- smoking, cooking and finishing
. Each will be discussed in more detail below but generally speaking, in terms of cook times, smoking will take 4-5 hours, cooking will take 4-5 hours and finishing will take about 20 minutes.
The Smoking Phase
Pork (meats, chicken, etc.) can only absorb smoke for between 4-5 hours. With this in mind, after adding the initial two-handfuls of Applewood chips, add the same amount after 1.5 hours and again 1.5hours after that (6 handfuls total). This will provide concentrated smoke for about 4.5 hours. At each addition you will have to remove the binder clips and lid, stir the briquettes around a bit with the Smokenator rod (or a metal kabob skewer) and then secure the lid and binder clips again. After 5 hours smoking at 225 degrees, the Pork will be ready to transfer to the cooking phase.

If, however, you’re not able to add wood ships every 1.5 hours and can only add them twice during the smoking phase (such as if you decide to attend an amazing Sunday morning class at
Recreate Fitness), use Hickory chips instead, the smoke is more potent than Applewood (but the smoke taste is slightly less sweet).
The Cooking Phase
Before starting the cooking phase, note the position of your bottom vent and swipe it a few times to clear out the ash from the burned briquettes, this will ensure a constant temperature during the cooking phase.
Pull off the Pork and wrap it thoroughly in aluminum foil.

Once wrapped, place your CDN probe into the side of the Pork, avoiding the bone. Make sure the probe penetrates about half way into the pork, with the point landing in the absolute center of the pork. After smoking, the center should register between 140 and 170 degrees.

Before placing the Pork back in the Weber, refill the Smokenator with unlit briquettes.

Now place the Pork back on the top rack.

There are a couple of options at this point. If company is arriving in 4-5 hours, continue to cook at 225 degrees. If company is coming in 2-3 hours, allow the Weber to heat to 300-350 degrees; either way, the goal is an internal temperature of 200 degrees (to heat to 300-350, empty the water BUT LEAVE THE EMPTY PAN on the top rack, it will keep the temperature regulated at between 300-350 degrees). I prefer the “low and slow” method (this particular Pork was started at 7:00am and finished at about 5:30pm).
Once the CDN probe reaches 200 degrees internal temperature pull the lid!
 The Finishing Phase
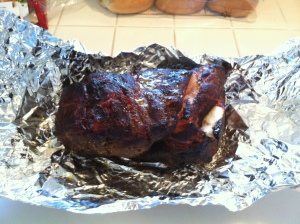
Remove the Pork from the Weber and unwrap it from the aluminum foil.

Make sure to dump all the water from the water pan in the Weber (if any remains), but leave the pan in the Weber; as the finishing phase will be placing the pork in a “dry environment” to form the crust on the Pork. Place the Pork back on the top rack. The temperature will hold between 300 and 350 degrees. After 20 minutes remove the lid.

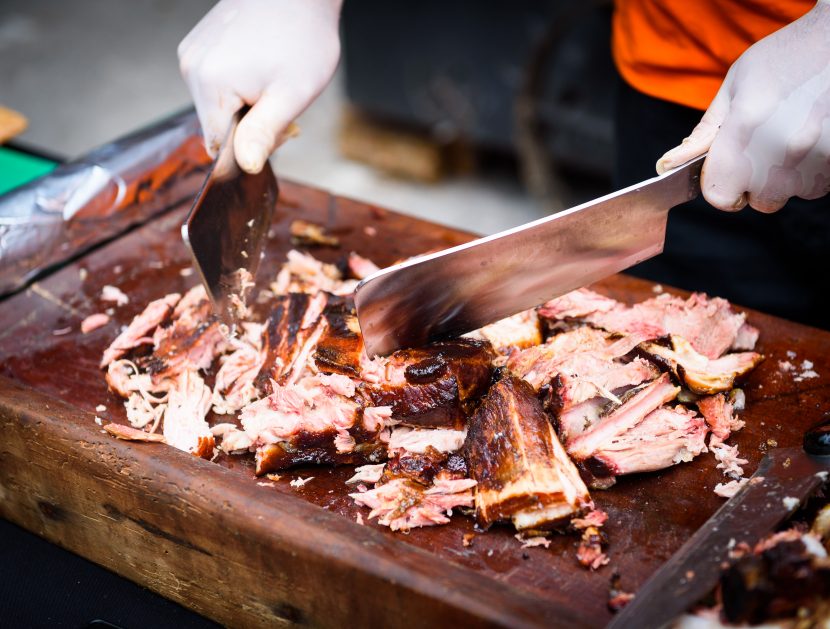
Again, wrap the pork so you can take it to the kitchen to shred. I prefer to shred with meat claws.

Unwrap the Pork to see the goodness.
Now begin shredding the Pork, note the beautiful pink smoke ring.

Once finished shredding, eat any way you like. I prefer to use a little
Sweet Baby Rays, top with some Appleslaw and serve on a
Pub Bun, perfection!

 8/17/14 UPDATE (Original post below): Few changes to note given the recipe below. First, with the soaked apple wood chips, add to the Smokenator every hour and smoke for between 4-5 hours to about 170 internal. Second, if placing the wrapped pork butt in an oven, ensure that there is a pan underneath. Third, once the cook phase is complete, place a layer of plastic wrap around the pork and place the pork in a cooler wrapped in towels to sit for about 3 hours. Fourth, after the pork has sit in the cooler, before serving, place back on the smoker for a dry smoke for about 20-30 minutes to allow the crust to bark up. When finishing this way, allow the empty water pan to sit over the Smokenator to keep the heat down during the dry smoke. If having pulled pork sandwiches, try a little Sweet Baby Rays BBQ Sauce, seems to go very well.
 Original Post:
One of the main goals of this page is to make really great, traditionally difficult, restaurant-caliber recipes accessible to everyone. With this in mind, the hardware required for each recipe should be common; and when it comes to BBQ, there is no more common tool than a Weber kettle.
The Hardware
That’s right, we will be making real, Texas-Style, smoked pulled pork not using a Traeger, a Bradley or even a Big Green Egg; but instead, a simple 22.5″ Weber Kettle. There is a required accessory, however, a Smokenator 1000. The Smokenator is the best way to cook low and slow using the indirect-method on a Weber Kettle and at around $60, it should fit most budgets. In Portland, you can buy Smokenator’s at the Portland BBQ Shop.
A few other things to have, I’ll explain where the come into play below:
– Kingsford original briquettes
– 2 large drip pans
– 1 bag of Applewood chips
– CDN Temperature Probe
– Chimney starter
– Non-toxic fire starter
– 4 Binder Clips
The Process
Buy a 4-5lb Pork Butt from your favorite local butcher.
Original Post:
One of the main goals of this page is to make really great, traditionally difficult, restaurant-caliber recipes accessible to everyone. With this in mind, the hardware required for each recipe should be common; and when it comes to BBQ, there is no more common tool than a Weber kettle.
The Hardware
That’s right, we will be making real, Texas-Style, smoked pulled pork not using a Traeger, a Bradley or even a Big Green Egg; but instead, a simple 22.5″ Weber Kettle. There is a required accessory, however, a Smokenator 1000. The Smokenator is the best way to cook low and slow using the indirect-method on a Weber Kettle and at around $60, it should fit most budgets. In Portland, you can buy Smokenator’s at the Portland BBQ Shop.
A few other things to have, I’ll explain where the come into play below:
– Kingsford original briquettes
– 2 large drip pans
– 1 bag of Applewood chips
– CDN Temperature Probe
– Chimney starter
– Non-toxic fire starter
– 4 Binder Clips
The Process
Buy a 4-5lb Pork Butt from your favorite local butcher.
 Rub the Pork Butt with your favorite Pork rub.
 I prefer SuckleBusters Competition BBQ Rub (this stuff is gooooood!).
 Wrap the Pork in plastic wrap and refrigerate overnight.
 At the same time, take your Applewood chips and soak them in water overnight.
 The following morning, make the settings on your Weber. On the bottom vent, stick a pencil in the gap and close the lower vent until it hits the pencil. On the lid vent, close it a little more than half way.
 Now insert the Smokenator. Once installed (it literally just drops in and latches slightly), load the Smokenator until its full, about 60 briquettes.
 Now:
– If the temperature outside is under 50 degrees, remove 20 briquettes from the Smokenator.
– If the temperature is over 50 degrees, remove 15 briquettes.
Place these removed briquettes into the chimney starter- DO NOT use lighter fluid on the briquettes, instead use your non-toxic fire starter to ignite.
Let these briquettes light for 15 minutes in the chimney, which will light them about 75%.
Now:
– If the temperature outside is under 50 degrees, remove 20 briquettes from the Smokenator.
– If the temperature is over 50 degrees, remove 15 briquettes.
Place these removed briquettes into the chimney starter- DO NOT use lighter fluid on the briquettes, instead use your non-toxic fire starter to ignite.
Let these briquettes light for 15 minutes in the chimney, which will light them about 75%.
 After 15 minutes, dump the briquettes back into the Smokenator (which contains the other unlit briquettes). This approach is known as the Minion Method, which allows the briquettes to slowly ignite and burn off, maintaining a low cook temperature that maintains in the kettle for 4-6 hours.
 With the briquettes in the Smokenator, place one of the large drip pans on the lower rack of the Weber.
 Place on the top rack of the Weber the second large drip pan and fill this pan with water.
 Place the cover on the Weber and let the temperature come up to 225 degrees.
 Once the temperature comes up and maintains 225, remove the lid and slide the water pan to the side slightly so you can lift the side edge of the top rack- allowing access to the briquettes in the Smokenator. Grab two handfuls of the soaked Applewood chips and spread them out over the lit briquettes in the Smokenator, this will start them smoking.
 Now close the top rack and slide the water back over the Smokenator. Grab your Pork Butt and place it over the large drip pan on the lower rack.
 Place the lid on the grill and secure it to the base of the kettle using the 4 binder clips.
 This will ensure that the smoke does not escape the side of the lid; it will also improve the longevity of the briquettes.
 Keep in mind from this point, there are 3 primary phases to this process- smoking, cooking and finishing. Each will be discussed in more detail below but generally speaking, in terms of cook times, smoking will take 4-5 hours, cooking will take 4-5 hours and finishing will take about 20 minutes.
The Smoking Phase
Pork (meats, chicken, etc.) can only absorb smoke for between 4-5 hours. With this in mind, after adding the initial two-handfuls of Applewood chips, add the same amount after 1.5 hours and again 1.5hours after that (6 handfuls total). This will provide concentrated smoke for about 4.5 hours. At each addition you will have to remove the binder clips and lid, stir the briquettes around a bit with the Smokenator rod (or a metal kabob skewer) and then secure the lid and binder clips again. After 5 hours smoking at 225 degrees, the Pork will be ready to transfer to the cooking phase.
Keep in mind from this point, there are 3 primary phases to this process- smoking, cooking and finishing. Each will be discussed in more detail below but generally speaking, in terms of cook times, smoking will take 4-5 hours, cooking will take 4-5 hours and finishing will take about 20 minutes.
The Smoking Phase
Pork (meats, chicken, etc.) can only absorb smoke for between 4-5 hours. With this in mind, after adding the initial two-handfuls of Applewood chips, add the same amount after 1.5 hours and again 1.5hours after that (6 handfuls total). This will provide concentrated smoke for about 4.5 hours. At each addition you will have to remove the binder clips and lid, stir the briquettes around a bit with the Smokenator rod (or a metal kabob skewer) and then secure the lid and binder clips again. After 5 hours smoking at 225 degrees, the Pork will be ready to transfer to the cooking phase.
 If, however, you’re not able to add wood ships every 1.5 hours and can only add them twice during the smoking phase (such as if you decide to attend an amazing Sunday morning class at Recreate Fitness), use Hickory chips instead, the smoke is more potent than Applewood (but the smoke taste is slightly less sweet).
The Cooking Phase
Before starting the cooking phase, note the position of your bottom vent and swipe it a few times to clear out the ash from the burned briquettes, this will ensure a constant temperature during the cooking phase.
Pull off the Pork and wrap it thoroughly in aluminum foil.
If, however, you’re not able to add wood ships every 1.5 hours and can only add them twice during the smoking phase (such as if you decide to attend an amazing Sunday morning class at Recreate Fitness), use Hickory chips instead, the smoke is more potent than Applewood (but the smoke taste is slightly less sweet).
The Cooking Phase
Before starting the cooking phase, note the position of your bottom vent and swipe it a few times to clear out the ash from the burned briquettes, this will ensure a constant temperature during the cooking phase.
Pull off the Pork and wrap it thoroughly in aluminum foil.
 Once wrapped, place your CDN probe into the side of the Pork, avoiding the bone. Make sure the probe penetrates about half way into the pork, with the point landing in the absolute center of the pork. After smoking, the center should register between 140 and 170 degrees.
 Before placing the Pork back in the Weber, refill the Smokenator with unlit briquettes.
 Now place the Pork back on the top rack.
 There are a couple of options at this point. If company is arriving in 4-5 hours, continue to cook at 225 degrees. If company is coming in 2-3 hours, allow the Weber to heat to 300-350 degrees; either way, the goal is an internal temperature of 200 degrees (to heat to 300-350, empty the water BUT LEAVE THE EMPTY PAN on the top rack, it will keep the temperature regulated at between 300-350 degrees). I prefer the “low and slow” method (this particular Pork was started at 7:00am and finished at about 5:30pm).
Once the CDN probe reaches 200 degrees internal temperature pull the lid!
There are a couple of options at this point. If company is arriving in 4-5 hours, continue to cook at 225 degrees. If company is coming in 2-3 hours, allow the Weber to heat to 300-350 degrees; either way, the goal is an internal temperature of 200 degrees (to heat to 300-350, empty the water BUT LEAVE THE EMPTY PAN on the top rack, it will keep the temperature regulated at between 300-350 degrees). I prefer the “low and slow” method (this particular Pork was started at 7:00am and finished at about 5:30pm).
Once the CDN probe reaches 200 degrees internal temperature pull the lid!
 Make sure to dump all the water from the water pan in the Weber (if any remains), but leave the pan in the Weber; as the finishing phase will be placing the pork in a “dry environment” to form the crust on the Pork. Place the Pork back on the top rack. The temperature will hold between 300 and 350 degrees. After 20 minutes remove the lid.
 Again, wrap the pork so you can take it to the kitchen to shred. I prefer to shred with meat claws.
 Unwrap the Pork to see the goodness.
 Now begin shredding the Pork, note the beautiful pink smoke ring.
 Once finished shredding, eat any way you like. I prefer to use a little Sweet Baby Rays, top with some Appleslaw and serve on a Pub Bun, perfection!